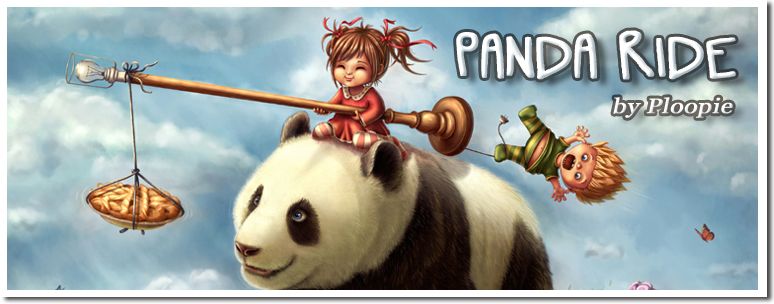
The Making of Panda Ride
I got asked to create a tutorial or better said a Making of Panda Ride for CGArena's online magazine called E-Zine.
I never made any type of tutorial before so this was a challenge and it sure took some time.
Not only did I lack alof of images from the process but it also had to be done in English.. within a week!
But I manage to finish it in time and I hope they fixed my typos etc.
The tutorial will explain abit of how I work from preparation to finished painting.
I do not always work the same way but this is how I did it for this artwork.
You can find the online magazine here: E-Zine magazine
On CgArena: Here
On DeviantArt: Here
I hope you will understand it and that I could help you in anyway.
If you have any questions feel free to ask!
The making of Panda Ride
I am no professional in this area this is just my hobby for now but I hope one day, somehow, somewhere I could work with art.
Keep in mind that this is not a tutorial how to draw or paint it's simply just an explanation how I created this artwork.
This painting was created for the ”Plans Gone Wrong” contest on DeviantArt.com Plans Gone Wrong
I do not have a lot of images saved from the process but I'll show you what I have and try to explain how I work as good as I can.
Tools
Paper and pen Wacom Intous 4 PaintTool Sai Photoshop 7
Preparations
I always start off with trying to imagine the picture in my head. This always happens in the middle of the night when I have to sleep.. I ”day dream” of how the picture could look like, how the characters move, what they say, how they interact with each other, imagine the story behind the picture etc. The more I plan it in my head the better the result will become.
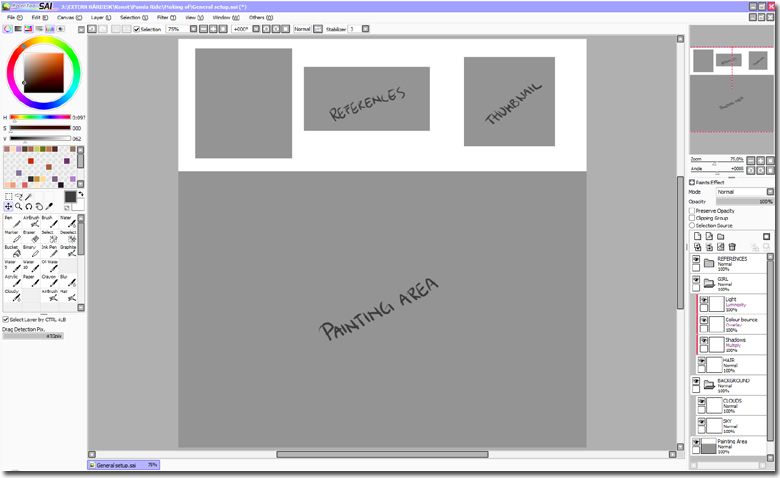
Working area This is what PaintTool Sai looks like and how I organize my work space. I have an area where I paint and an extra space above it to add references and thumbnails. I choose to have it like this so I can always see the references and the thumbnails without them being on top of the painting.
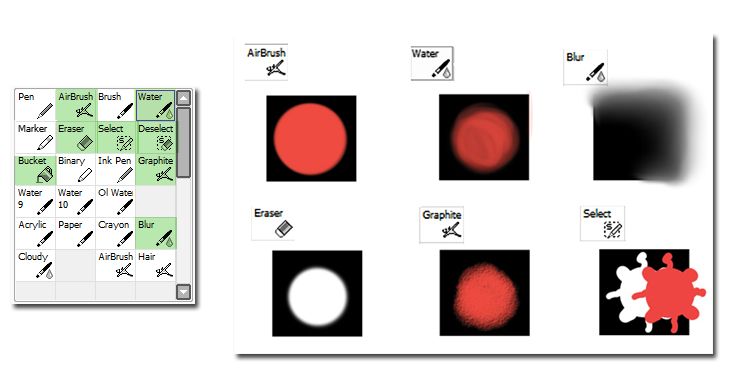
Brushes
Those highlighted in green are the tools I use the most. Here you can also see what some of them do. Water tool is my favourite at this moment.
References
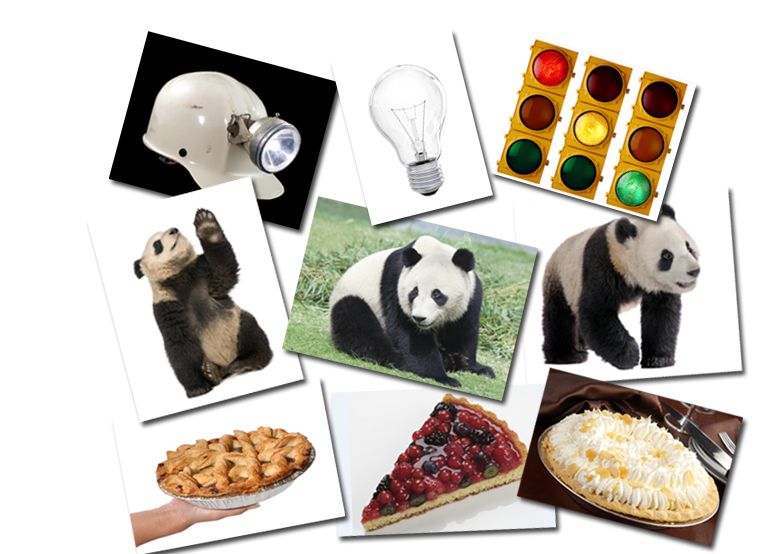
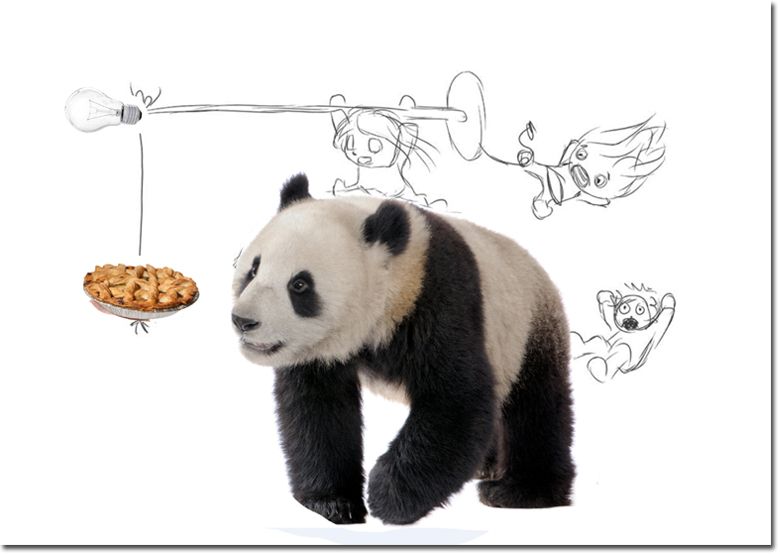
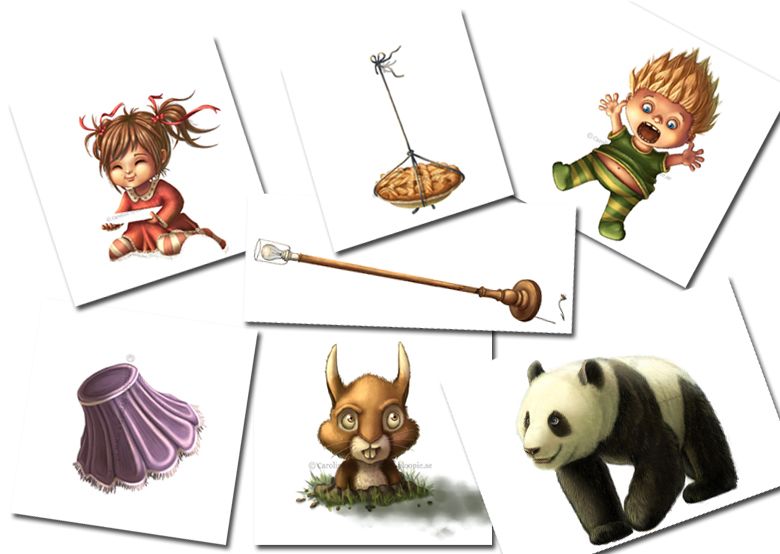
Since this was for a contest I had to use certain stock images of pandas, pies and lamps. Minimum one of each. I was allowed to create it in any medium as long the pie, panda and the lamp were recognisable to the original stock image, I couldn’t alter it too much or it would have been disqualified. I normally use references when drawing, most of the time I use a mirror to see my own face and body. This helps a lot when you want a certain pose or an expression in a characters face. I also photograph a lot of things.
Sketching
After some hours or even days of trying to imagine the picture in my head I try to get those ideas down on paper. Sometimes I doodle it down in my sketchbook I have next to my bed so I will not forget it over night. But most of the time I do it digitally in Sai so I don't have to scan the image or redraw it again.
After a couple of sketches I decided to work with this one.
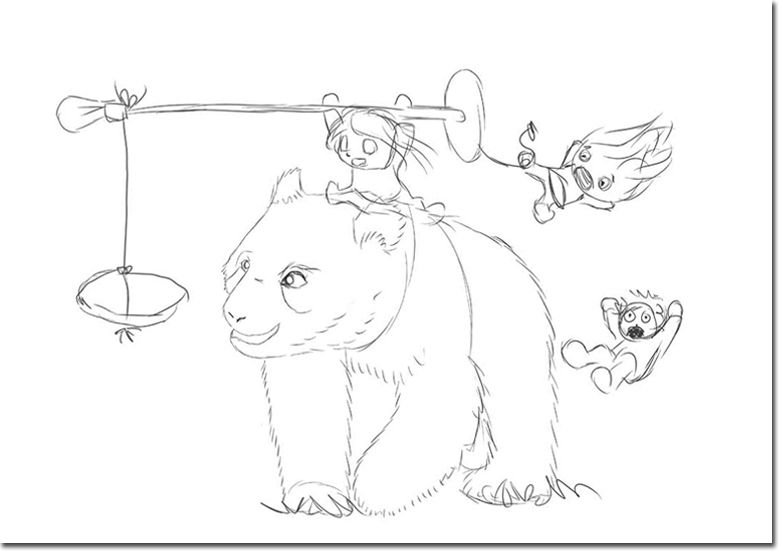
Here you can see the sketch with the stock images I wanted.
Thumbnails
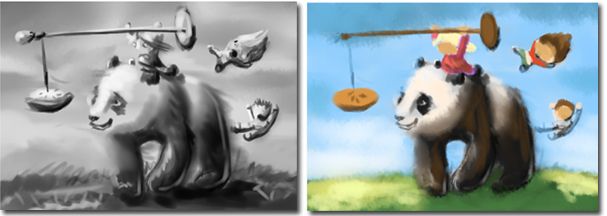
In my opinion this is actually a very important thing to do. I like to see the artwork “finished” in a miniature version before I start colouring and go into details. It is good to have a guide to look at when you start to apply shadows etc. later on. It's very easy to forget the whole picture when you start to zoom in and work on details. Specially the light source..
I made one black and white to see where I wanted the light and shadows etc. and then a thumbnail to test colours. I kept these visible in the area above the painting during the whole process. They look better if you squint your eyes.
Refining the sketch
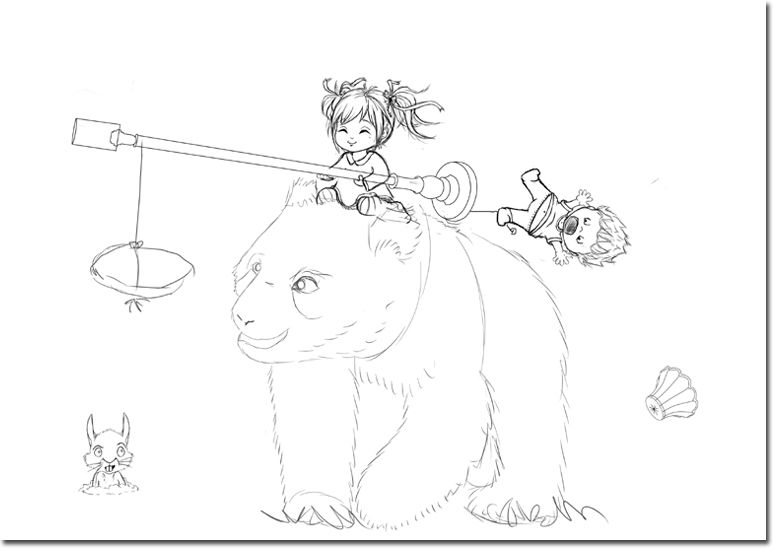
When I was sure what I wanted I started to refine the sketch. What I normally do is that I take the original sketch and lower the opacity, create a new layer above it and make a new more detailed and cleaned sketch.
Here you can see I removed the third kid in the picture and replaced him with a screen from the lamp instead. Also added a bunny in the end to give the picture some balance. Actually I have no clue how to balance a picture I just went with what I thought looked the best.
Layers
I always work in many layers, sometime too many. I have everything organized, well most of the time.. Each object have their own folder and their own layers for shadow, light, clothes, details, skin, hair etc. This helps me when colouring and if I would change my mind with my colour choice it's very easy to change. Or if I wish to remove an unwanted detail like for example ribbons or just to resize a object.
Here is an example of how my layers can look like during the process. I will not even bother trying to count my layers on Panda Ride, too many.. When I'm done with the painting I sometimes merge the layers for each objects but only when I am 100% sure I will not work on them again. And sometimes I just have to merge some layers or my computer will be very cranky also to prevent waiting 10 minutes every time I save.
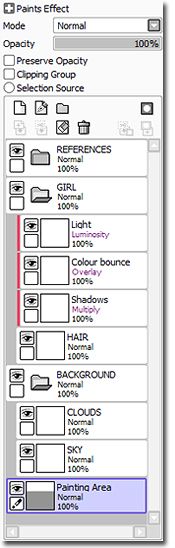
I normally work with one object at the time to not drive myself crazy.
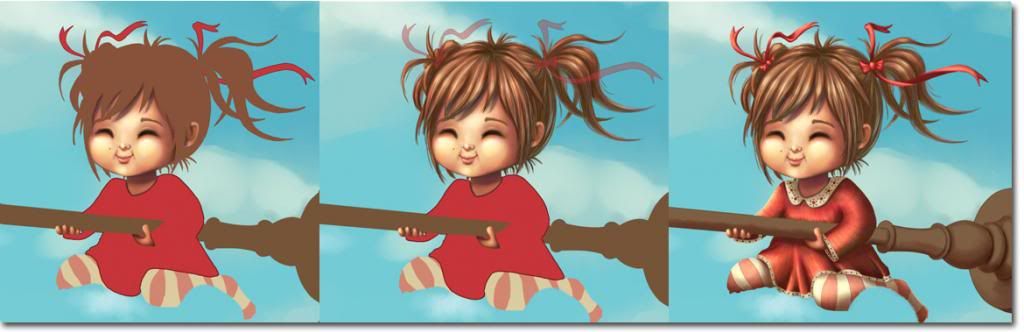
Colouring
I normally start with what is underneath and work my way out. Skin-->hair-->clothes-->details etc. I also start with adding the shadows and then move on to the details and in the end I add light.
Here you can see a bit of the process of how I coloured the little girl.
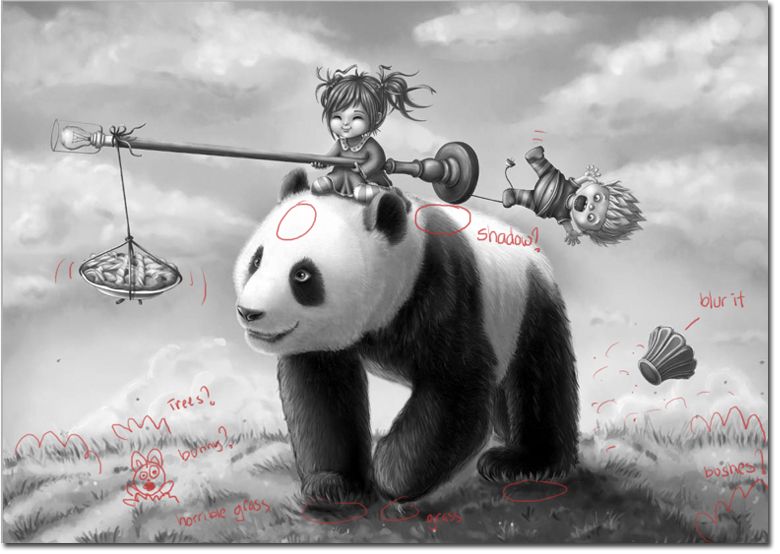
Critique your own work
Now and then during the colouring process I take a screen shot, make it grey scale and put it above all the layers. I mainly do this to check the values but also to ”reset my vision” and look at the picture differently so I can see ”problems” easier without having the colours interfere. Even better is to flip the whole paining, take some hour break or days, come back and note everything down you think looks off. I normally note this down in red on the screenshot and try to fix the problems later.
Final editing
I could work on an artwork forever.. specially details but I normally stop when I feel I'm done, when I feel I do not have to fix any more major “problems” to make it look al right.
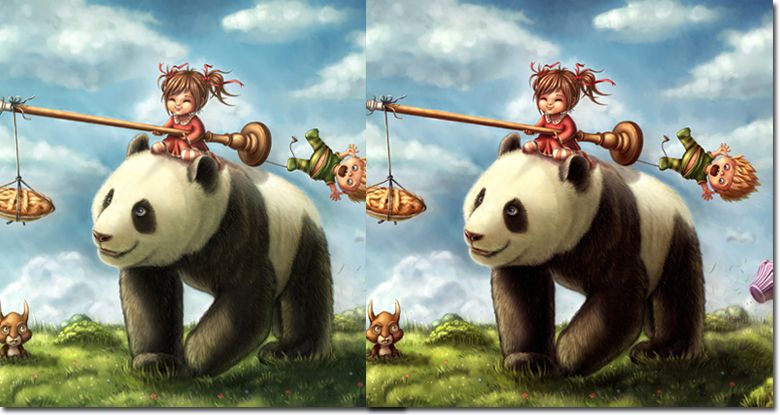
After I was totally done with everything on the painting I saved it as .jpeg and opened it up in Photoshop. There I cropped away that extra area so it became A4 again, changed the intensity abit, colours, shadows, blurred some objects and changed whatever was needed to make it even ”perfect”.
And then I created a smaller version with a watermark, including my name and website, that I can post on other sites, so if anyone would see the painting they would know who made it and where to go to see more. Also helps to avoid art theft and the worry if people will credit you or not when they share your artwork on their blogs etc.
Here you can see the “original” artwork and the one edited in Photoshop.
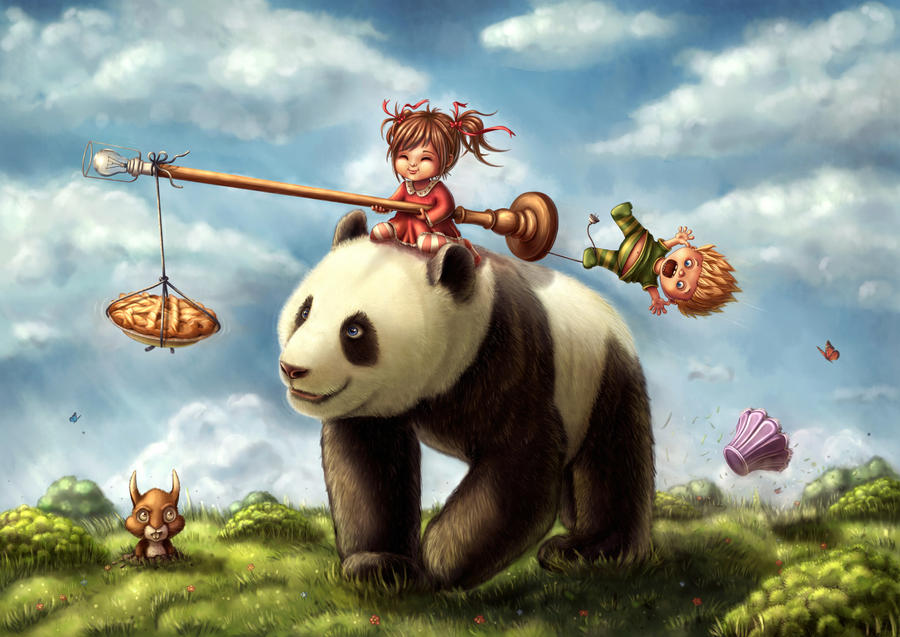
..and around 100 hours later this is the end result. And it was totally worth it because I won the contest!
Plans Gone Wrong Winners
Well that was about it! Thank you for reading and I hope you enjoyed this little guide and that I could help you in some way.
Feel free to ask any questions!